Install OpenVPN server on OpenWRT router

This guide reflects my personal notes for personal use; it expects you to have an up-and-running OpenWRT firmware on your router, an existing dynamic DNS service available as well as know your way around Terminal i.e. CLI and SSH. These instructions below are published for people to compare notes and understand the process like I did. Kindly understand that I cannot be held responsible for any mistakes or malfunctions on your side.

I recently decided to install a secondary OpenVPN server on my Asus RT-58U router, as a backup gateway to my home network.

1. Package Installation

To set up and configure an OpenVPN server so we can connect to our home’s local network, we need to first install the following packages:

$ opkg update
$ opkg install openvpn-openssl openvpn-easy-rsa
$ opkg luci-app-openvpn ipset
$ /etc/init.d/uhttpd restart

Additionally, as my preferred editor is nano and it doesn’t come with OpenWRT, it’s a good idea to install that one, too:

$ opkg install nano

So we have first updated/refreshed the latest available packages from the source repository; then we installed the 4 needed packages; finally, we just restarted the router’s web server daemon.

Note: In case there is a need to re-install a package and its dependencies, use the --force-reinstall parameter:

$ opkg install --force-reinstall openvpn-easy-rsa

2. Generating Necessary Keys

Next, we need to generate the required server keys and certificates using easy-rsa. It is recommended that we move our easy-rsa files from the default location so that we don’t accidentally overwrite those in case of a system or firmware update.

For a fresh installation on an OpenWRT firmware:

$ mkdir /etc/config/openvpn-asus
$ mv /etc/easy-rsa/* /etc/config/openvpn-asus/
$ ln -s /etc/config/openvpn-asus /etc/easy-rsa

For an existing installation after an OpenWRT firmware update:

$ ls -la /etc/config/openvpn-asus
$ rm -rf /etc/easy-rsa
$ ln -s /etc/config/openvpn-asus /etc/easy-rsa

The idea here is that we create an independent folder to store all of our keys instead of the /etc/easy-rsa/ folder, as the latter does not survive a firmware update; we only need to link symbolically this original (and needed) folder /etc/easy-rsa/ to point to our own folder under /etc/config/ that does survive a firmware update.

Now, we must generate the certificates for the server and client(s). We need to start by editing a few lines in the /etc/easy-rsa/vars file and enable stronger 2048-bit encryption. Edit this file with e.g. nano and change the following variables with your own details:

set_var EASYRSA_REQ_COUNTRY "My Country"
set_var EASYRSA_REQ_PROVINCE "My Province"
set_var EASYRSA_REQ_CITY "My City"
set_var EASYRSA_REQ_ORG "My Organisation"
set_var EASYRSA_REQ_EMAIL "My Mail Address"
set_var EASYRSA_REQ_OU "My Department Name"

Note: The first parameter EASYRSA_REQ_COUNTRY requires a 2-digit country code like GR, FR, DE, IT, NL, UK, DK etc.

Now uncomment, further down, the following line by removing # so it appears like this:

set_var EASYRSA_KEY_SIZE 2048

Next, we generate the “Diffie-Hellman” key agreement parameters, our “Certificate Authority” and pre-shared key pairs, signed locally. Run each command at a time by first moving to the needed directory.

cd /etc/easy-rsa
source vars

We first set the needed configuration parameters, by entering these on the CLI:

export EASYRSA_PKI="/etc/easy-rsa/pki"; \
export EASYRSA_REQ_CN="ovpnca"; \
export EASYRSA_BATCH="1"

Now, we remove and re-initialise the PKI directory. If you are curious, you can do ls -la ./pki before and after this procedure, to check the contents. Simply run:

$ easyrsa init-pki

Now let’s generate the “Diffie-Hellman” parameters (will take some minutes) and create a new “Certificate Authority” certificate, by validating their creation via cat afterwards:

$ easyrsa gen-dh
$ cat /etc/easy-rsa/pki/dh.pem

$ easyrsa build-ca nopass
$ cat /etc/easy-rsa/pki/ca.crt

Note: You may have noticed that we selected to not have a password set, by using nopass parameter.

Next, we need to generate the server keys and the client keys, both signed locally:

easyrsa build-server-full server nopass
cat /etc/easy-rsa/pki/private/server.key

easyrsa build-client-full client nopass
cat /etc/easy-rsa/pki/private/client.key

Finally, we need to generate the TLS pre-shared keys (PSK) for our installation:

$ openvpn --genkey --secret ${EASYRSA_PKI}/tc.pem
$ cat /etc/easy-rsa/pki/tc.pem

Note: Remember that EASYRSA_PKI was defined earlier.

3. Set Firewall Parameters

Next, we need to define and change the firewall parameters. For this server installation, we consider the VPN network as private and we assign the VPN interface directly to our LAN zone to minimise firewall setup. Then, we permit (i.e. open) access to the VPN server from WAN (Wide Area Network) zone.

First we set some more needed configuration parameters, such as the firewall port and protocol, by entering these on the CLI:

OVPN_PORT="1193"; \
OVPN_PROTO="udp";

Note: Despite the standard VPN port being 1194, here we set it to 1193 as this VPN server installation is a backup VPN (since one exists already on a NAS server running OpenMediaVault, in the same home network). For a single VPN server in a home network, change to default value 1194 where needed.

Run the following two multi-line commands on CLI:

uci rename firewall.@zone[0]="lan"; \
uci rename firewall.@zone[1]="wan"; \
uci del_list firewall.lan.device="tun+"; \
uci add_list firewall.lan.device="tun+"; \
uci -q delete firewall.ovpn;

and

uci set firewall.ovpn="rule"; \
uci set firewall.ovpn.name="Allow-OpenVPN"; \
uci set firewall.ovpn.src="wan"; \
uci set firewall.ovpn.dest_port="${OVPN_PORT}"; \
uci set firewall.ovpn.proto="${OVPN_PROTO}"; \
uci set firewall.ovpn.target="ACCEPT"; \
uci commit firewall; \
/etc/init.d/firewall restart

Note: Again, remember that OVPN_PORT and OVPN_PROTO were defined earlier. Now let’s verify the new firewall entries that we saved above, by running:

$ uci show firewall.ovpn

In the meantime, we also need to check if packet forwarding is enabled; it should be by default. A result “1” denotes that it is active:

$ cat /proc/sys/net/ipv4/ip_forward

4. Create OpenVPN Server Instance

Now, we must create our OpenVPN instance (named “asus_server”) that will be soon visible in the OpenWRT interface (by going to menu VPN and clicking on OpenVPN page):

export EASYRSA_PKI="/etc/easy-rsa/pki"; \
uci set openvpn.asus_server="openvpn"; \
uci set openvpn.asus_server.enabled="1"; \
uci set openvpn.asus_server.dev="tun"; \
uci set openvpn.asus_server.port="1193"; \
uci set openvpn.asus_server.proto="udp"; \
uci set openvpn.asus_server.comp_lzo="no"; \
uci set openvpn.asus_server.log="/tmp/openvpn.log"; \
uci set openvpn.asus_server.status="/var/log/openvpn.log"; \
uci set openvpn.asus_server.verb="3"; \
uci set openvpn.asus_server.mute="5"; \
uci set openvpn.asus_server.keepalive="10 120"; \
uci set openvpn.asus_server.persist_key="1"; \
uci set openvpn.asus_server.persist_tun="1"; \
uci set openvpn.asus_server.user="nobody"; \
uci set openvpn.asus_server.group="nogroup"; \
uci set openvpn.asus_server.ca="${EASYRSA_PKI}/ca.crt"; \
uci set openvpn.asus_server.cert="${EASYRSA_PKI}/issued/server.crt"; \
uci set openvpn.asus_server.dh="${EASYRSA_PKI}/dh.pem"; \
uci set openvpn.asus_server.key="${EASYRSA_PKI}/private/server.key"; \
uci set openvpn.asus_server.mode="server"; \
uci set openvpn.asus_server.server="192.168.0.0 255.255.255.0"; \
uci set openvpn.asus_server.tls_server="1"; \
uci set openvpn.asus_server.topology="subnet"; \
uci set openvpn.asus_server.route_gateway="dhcp"; \
uci set openvpn.asus_server.client_to_client="1"; \
uci commit openvpn

Finally, we need to define the settings to be “pushed” to clients that will connect, reflecting the above parameters:

uci add_list openvpn.asus_server.push="comp-lzo no"; \
uci add_list openvpn.asus_server.push="persist-key"; \
uci add_list openvpn.asus_server.push="persist-tun"; \
uci add_list openvpn.asus_server.push="user nobody"; \
uci add_list openvpn.asus_server.push="user nogroup"; \
uci add_list openvpn.asus_server.push="topology subnet"; \
uci add_list openvpn.asus_server.push="route-gateway dhcp"; \
uci add_list openvpn.asus_server.push="redirect-gateway def1"; \
uci add_list openvpn.asus_server.push="192.168.0.0 255.255.255.0"; \
uci add_list openvpn.asus_server.push="dhcp-option DNS 9.9.9.9"; \
uci add_list openvpn.asus_server.push="dhcp-option DNS 1.1.1.1"; \
uci commit openvpn

So, what have we achieved with the commands above? In the first part, we perform the following server operations:

  • Set and enable VPN instance;
  • Specify TUN routing or TAP bridging;
  • Specify port and protocol to use;
  • Set if compression is used;
  • Specify logging verbosity and log paths;
  • Specify keep-alive duration, key and tunnel persistence across restarts;
  • Set user and group less-privileged account (UNIX/Linux/Mac only);
  • Specify certificate information;
  • Set server mode (including own subnet) and necessary authentication setting;
  • Specify recommended topology and gateway;
  • Set if clients are allowed to “see” each other.

    Similarly, in the second part, we define the same settings to be communicated to the client as needed:

  • Use the same compression setting;
  • Keep both key and tunnel persistent across VPN restarts;
  • Use same user and group as a less-privileged account;
  • Use the same topology and gateway;
  • Redirect ALL traffic through the VPN server*;
  • Push a local route to the client, allowing to access the server’s network;
  • Push a pre-defined DNS to your client*.

    (*) Extremely useful if the client’s local network cannot be trusted e.g. airports, workplace or coffee shops.

    We can now restart the service to apply our changes:

    $ /etc/init.d/openvpn restart
    

    To view the above settings at any moment:

    $ uci show openvpn.asus_server
    $ uci show firewall.ovpn
    

    We need to be sure that the OpenVPN server is enabled and has started:

    $ /etc/init.d/openvpn enable
    $ /etc/init.d/openvpn start
    

    At any moment, we can check the logs for a successful server initialization and the respective service is running as expected:

    $ cat /tmp/openvpn.log
    $ cat /var/log/openvpn.log
    $ pgrep -f -a openvpn
    

    A likely output from these logs above indicating success, would be:

    $ cat /tmp/openvpn.log
    
    OpenVPN 2.4.7 arm-openwrt-linux-gnu [SSL (OpenSSL)] [LZO] [LZ4] [EPOLL] [MH/PKTINFO] [AEAD]
    library versions: OpenSSL 1.1.1j  16 Feb 2021, LZO 2.10
    Diffie-Hellman initialized with 2048 bit key
    TUN/TAP device tun0 opened
    TUN/TAP TX queue length set to 100
    /sbin/ifconfig tun0 192.168.0.1 netmask 255.255.255.0 mtu 1500 broadcast 192.168.0.255
    Could not determine IPv4/IPv6 protocol. Using AF_INET
    Socket Buffers: R=[163840->163840] S=[163840->163840]
    UDPv4 link local (bound): [AF_INET][undef]:1193
    UDPv4 link remote: [AF_UNSPEC]
    GID set to nogroup
    UID set to nobody
    MULTI: multi_init called, r=256 v=256
    IFCONFIG POOL: base=192.168.0.2 size=252, ipv6=0
    Initialization Sequence Completed
    
    $ cat /var/log/openvpn.log
    
    OpenVPN CLIENT LIST
    Updated,Sat Feb 20 16:20:30 2021
    Common Name,Real Address,Bytes Received,Bytes Sent,Connected Since
    ROUTING TABLE
    Virtual Address,Common Name,Real Address,Last Ref
    GLOBAL STATS
    Max bcast/mcast queue length,0
    END
    

    5. Creating Client Configuration File

    With the OpenVPN server now in place and running, we can finally create the client’s configuration .ovpn file to be used with the remote client computer. In a plain-text file called for example Asus.ovpn enter the parameters found below, using your favourite editor on your computer. Below is a manual process that will require some copying and pasting from your Terminal window.

    auth-nocache
    client
    comp-lzo no
    dev tun
    mute 10
    nobind
    persist-key
    persist-tun
    proto udp
    remote YOUR-DOMAIN-NAME 1193
    remote-cert-tls server
    resolv-retry infinite
    script-security 1
    verb 3
    <key>
    # Insert here the client's generated private key from:
    # cat /etc/easy-rsa/pki/private/client.key
    </key>
    <cert>
    # Insert here the client's generated certificate from:
    # cat /etc/easy-rsa/pki/issued/client.crt
    </cert>
    <ca>
    # Place here the server's generated certificate from:
    # cat /etc/easy-rsa/pki/ca.crt
    </ca>
    

    We are now ready to use VPN client tools such as Tunnelblick on macOS. As we have not defined a user or password, connecting to our router will simply need to run the VPN client software and launch our configuration.

    IMPORTANT NOTE: You need to replace the YOUR-DOMAIN-NAME entry found above with either your fixed WAN IP address if you have one, or a dynamic DNS name, such as those kindly provided by DuckDNS. This is an absolutely needed parameter as the client computer must know where to connect, obviously!

    N.B. For those wondering, like myself, as to why there is no <tls-auth> section in the above configuration, according to the OpenVPN – Getting Started / How-To page:

    Please note that you cannot use “–tls-crypt” and “–tls-auth” options at the same time […] Using “tls-crypt” also does not need to care about the KEYDIR as it is handled automatically.

    Sources & Further Reading

    The knowledge acquired and the guide above would not have been possible without the following sources:

  • Reference Manual for OpenVPN
  • OpenWRT for OpenVPN Server Instructions
  • OpenWRT for OpenVPN Client using LuCI Instructions
  • OpenVPN – Getting Started / How-To
  • Setup OpenVPN Server on OpenWRT Router
  • Understanding OpenVPN Tap vs Tun Mode
  • Enable automatic fsck upon booting OSMC (Raspberry Pi3)

    With the absence of a small button to wake-up or boot-up the Raspberry Pi3 when running OSMC, being forced instead to cut-off DC power via some switch or leave it permanently on, I felt the need to introduce a more persistent file-system integrity check upon each boot or reboot of the device.

    This is where fsck comes in, from the world of Unix; however, I had no idea where to enable it for running during boot-time.

    Thanks to the people at the OSMC Support and especially to user DBMandrake (who is an OSMC developer) I, too was able to find the location of the files to edit, as well as the additional changes needed.

    Obviously, you need to have SSH installed and know how to connect to your Pi3 device and then log in with the known credentials for OSMC via SSH that are osmc/osmc for username/password, respectively.

    According to DBMandrake we need to make 2 specific changes in our system:

    For anyone who wants to enable an automated fsck with repair, right now all you need to do is edit file /etc/fstab and change the second number at the end of each line from 0 to 1 (systemd doesn’t make any distinction between 1, 2, 3 etc. so using numbers above 1 makes no difference) then edit the file /boot/cmdline.txt and at the end of the same line, add a space then add fsck.repair=yes option. You should now see a two line fsck scan in the top left corner of the blue splash screen momentarily during boot. When no repairs are needed it only takes a couple of seconds.

    So with this solution in hand, I was able to log-in via ssh from Terminal on my Mac OS X, and quickly modify these 2 files as explained. For Windows users, PuTTY is the obvious and straight-forward tool for SSH. Just remember that since it may be the first time ever to connect to your Raspberry Pi3 device, you may be asked to confirm the key fingerprint of the secure connection.

    In my screenshot you can see the end-result after connecting to an OSMC system.

    Install missing AppStore purchase that’s not visibly available (like macOS Sierra)

    Once macOS 10.13.0 High Sierra became officially available to the public, I decided to keep a backup of the macOS 10.12.6 Sierra installation application on my Mac, for archiving reasons. I normally do this when every new macOS release is out, since the 10.xx.0 versions tend to be buggy. I did the exact same thing with El Capitan 10.11.6 when Sierra was officially out, last fall.

    However, to my surprise, when I visited the AppStore on my Mac, I could not find the Install macOS Sierra entry, which I had very well downloaded some time ago. It was either deleted from the AppStore or visibly not available to end-users, anymore. This was just days after High Sierra was out.

    Whilst searching for answers, I stumbled across a discussion over at MacRumors Blog where people confirmed this, too, and expressed their dissatisfaction to the fact that Apple had removed Install macOS Sierra from their AppStore so quickly; not to mention a theory that this specific download doesn’t really make part of official or registered purchases by end-users, like all previous (and still available) Mac OS X releases. Strange.

    But thanks to user jasminetroll and his/her straight-to-the-point tip, I was able to re-download Install macOS Sierra.app officially, using some Terminal magic and with very little hassle, compared to other (evidently, more painful) methods such as the one described over at 7 Labs.

    The main tool needed is the mas-cli utility by Dmitri Rodionov, found at GitHub. Download the latest version (currently at v1.3.1) and unpack, then copy the binary executable to a location that you can freely run from; for example /opt/local/bin/ if you have MacPorts already present, or simply /usr/local/bin/ through Administrator authentication.

    Next, just go to any temporary location such as ~/Downloads/ and run the command with the following parameters, as jasminetroll points out:

    mas install 1127487414

    The process will launch the download of the selected AppStore application (in this case, 1127487414 is linked to Install macOS Sierra) on both on the Terminal and Dock:

    This rather easy process results to an application bundle that evidently contains a properly-signed MAS receipt linked to my connected Apple ID, it seems:

    Once the download is complete, user jasminetroll advises to confirm the signature information as proof that it is indeed an official download of the Sierra installer:

    codesign -dv /Applications/Install\ macOS\ Sierra.app

    …that results to the following output on Terminal:

    Executable=/Applications/Install macOS Sierra.app/Contents/MacOS/InstallAssistant_springboard
    Identifier=com.apple.InstallAssistant.Sierra
    Format=app bundle with Mach-O thin (x86_64)
    CodeDirectory v=20200 size=321 flags=0x2200(kill,library-validation) hashes=4+3 location=embedded
    Signature size=4605
    Info.plist entries=30
    TeamIdentifier=K36BKF7T3D
    Sealed Resources version=2 rules=7 files=137
    Internal requirements count=1 size=124

    Now, an official Install macOS Sierra application is available to run!

    …which also includes the very useful createinstallmedia tool by Apple that allows the creation of USB installers (via Terminal, of course).

    JUNE 2018 UPDATE

    It seems Apple now offers the chance to (re-)download a couple of previous OS versions by publishing on their Knowledge Base the direct links to AppStore:

    For further reading, you can visit the related StackExchange thread.

    Speed up SMB transfers in El Capitan Mac OS 10.11.x

    Until recently, I’ve been working on a Mac using Yosemite 10.10.5 and was quite happy with it, but since Sierra 10.12.2 was out, I knew I had to move on in my life, so I decided to make a clean installation (dual boot) of El Capitan to the latest available version 10.11.6 including all recent updates from Apple. However, I soon realized that my connections to both network backup HDDs via SMB was painfully slow, evidently much slower than I was used to, when synchronizing files from my Mac to my Western Digital network drives.

    This meant that Apple most likely fiddled again with SMB (Samba) protocol in this OS X release, and once more we had to find a fix for returning to “status quo”. After all, I was using on my Gigabit home LAN two different WD network storage devices, namely MyBook II World (2x1TB) and MyCloud (1x2TB), most likely with different SMB implementations each.

    I had read that in the older days, a quick solution to force Mac OS X to use older SMB versions, was to use CIFS protocol; but today, this didn’t work. So, this time I mounted via Finder both drives (Cmd + K) forcing the smb:// protocol:

    Finder Server Connect

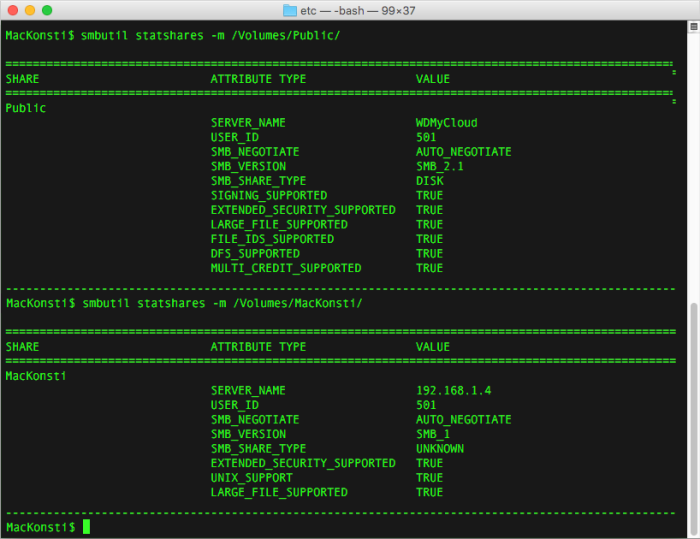
    Next, in Terminal.app the following output was presented, after running the needed query command smbutil per volume:

    SMB Shares Information

    This showed that older MyBook World II negotiates with SMB 1.x protocol (latest firmware v01.02.14 available) and later MyCloud storage asks for SMB 2.x protocol (firmware v03.04.01-230 kept on purpose) therefore causing a possible performance issue with latest Mac OS X systems, due to their newer and seemingly more secure SMB implementation.

    After digging around, I read that there’s a hidden fix for SMB, just like the one posted by Dan Roncadin in his related article, which apparently increases transfer speeds due to the fact that it disables “client signing”. As Dan Roncadin writes:

    The issue seems to come down to Apple’s SMB forcing default enabling of “client signing” which ruins performance.

    The fix consists of setting a parameter in file nsmb.conf in folder /etc/ with sudo privileges, forcing the system to obey the parameter on the next use of SMB protocol (and after each reboot, obviously):

    [default]
    signing_required=no

    The way to implement this parameter is to quickly open Terminal.app and apply this command as your administrator password will be requested:

    sudo printf "[default]\nsigning_required=no\n" | sudo tee /etc/nsmb.conf >/dev/null

    Then, either restart your Mac (if you’re used to do this, due to some older Windows habit like mine) or simply unmount and re-mount your SMB shares. Please note that on a clean installation of El Capitan, this file (and therefore, parameter) does not exist, due to the fact that Apple considers this a lesser security measure; but for home connections, it is fine by me.

    Through the application “GoodSync” I was able to re-check the speed and it seems things returned to normal; I didn’t go into much detailed speed measurements, but I am sure any improvement is welcome at this stage. Also, this is confirmed to have a positive effect on speed, as mentioned by users over at Computer Audiophile where they post their (positive) results after applying this fix.

    Finally, should you wish to reverse the “fix”, simply remove this file (better via Teminal, again) by running:

    sudo rm /etc/nsmb.conf

    References and articles:

    Setup Windows 10 with as little user information leak as possible

    We need to embrace the future, at some point in life, so I decided to install and try out Windows 10 (64-bit) on my virtual machine, despite being happy using the now depreciated -by Microsoft standards- Windows 7 operating system, on my work laptop and other virtual machine on my Mac computer. Windows 10 is here and I need to find more how to get around it, as I had decided to skip Windows 8.x fooling around, altogether.

    I heard many people and friends in IT telling me that Windows 10 is good enough and deep down resembles to previous Windows iterations, but the only serious drawback was the widely-publicized and criticized “leak” of user data and information, a very deterring issue for whoever wants to move across and take the… leap of faith. So I decided to read and collect articles and bits about the security of Windows 10 and how to enforce user-preferences for the least leaking possible.

    Also, despite the numerous and detailed articles, I was also happy to encounter private efforts of people that put all those needed system changes and tweaks in one, concise tool, that would help speed-up the “securing” procedure and also make sure that no communication “hole” -based on up-to date knowledge- is left open.

    FURTHER READING IS A MUST

    There is a large number of interesting articles found on the Internet, providing step-by-step instructions on how to disable such “spying” by means of Control Panel settings. The most notable for me, are:

    1) Windows 10 violates your privacy by default, here’s how you can protect yourself by TechRepublic.com (with screenshots of each window’s settings)

    2) Fix Windows 10 privacy by IsLeaked.com (includes Windows 7 and 8 fixes, too, that I ignored until reading the article)

    3) How to Configure Windows 10 Privacy Settings During Setup by MakeUseOf.com

    4) The Ultimate Windows 10 Security and Privacy Guide by HeimdalSecurity.com (with explanations on each security switch that needs to be turned off)

    It seems that even during setup of Windows 10 on any machine, choosing the correct privacy settings is equally critical, for starters.

    RUN IT AFTER YOU’VE DONE IT

    Following the tips and steps that most of these -and similar- articles advise, I could not rest assured that the work was fully done. As usual with our modern world, suspicion crawled in and I felt that there was more to be done to secure my privacy.

    This is lunacy, considering how much effort and time is spent on protecting my own data and related information or statistics, when such “leaks” from the new Windows OS could have not been included the first place! The IT world is definitely taking an unknown, darker path.

    Thus, based on the original article by BGR.com titled 6 free tools that stop Windows 10 from spying on everything you do -despite being written over a year ago- I was still happy to see that some of these tools have still been around and kept updated, making our life towards better privacy a little more easy.

    Until today, a year after Windows 10 was released, there are 2 tools that really stand out of the crowd.

    “W10Privacy”

    First to be considered is the tool called W10Privacy from a German developer (found here) now with English/French/German/Spanish menus -most likely due to its grown popularity- what started as a private own project.

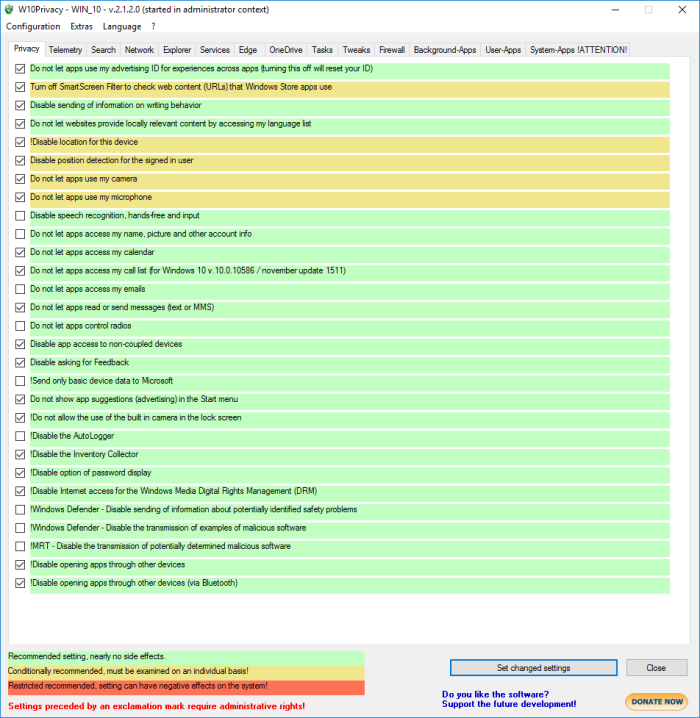
    With its simple, straight-forward interface, W10Privacy wins the power-user but may scare novices, a little. It includes a comprehensive list of security tweaks and checks, most of them not found anywhere near Control Panel. As the website mentions:

    Microsoft generously enables everybody to change the concerning settings, but hides them in countless menus, where a normal user does not want to search for!

    The program should therefore be a help, to display the available settings relatively clearly and to set the desired options if necessary.

    Do not be overwhelmed by the many tabs; it’s just a logical split of tweaks instead of having them all-in-one list. It is intimidating -for sure- but the list seems quite exhaustive. The user or administrator is assisted with color-coding of each tweak, denoting severity and recommendation level. The developer also writes that the project is work-in-progress so we are bound to see more settings to be enabled or disabled with coming versions.

    W10Privacy Main Window

    Using W10Privacy relies on selecting the tweaks for each category, and then apply them. There is an option for creating a -many times needed- restore point, so the user can revert in case some functionality… well… get “screwed”.

    “DoNotSpy10”

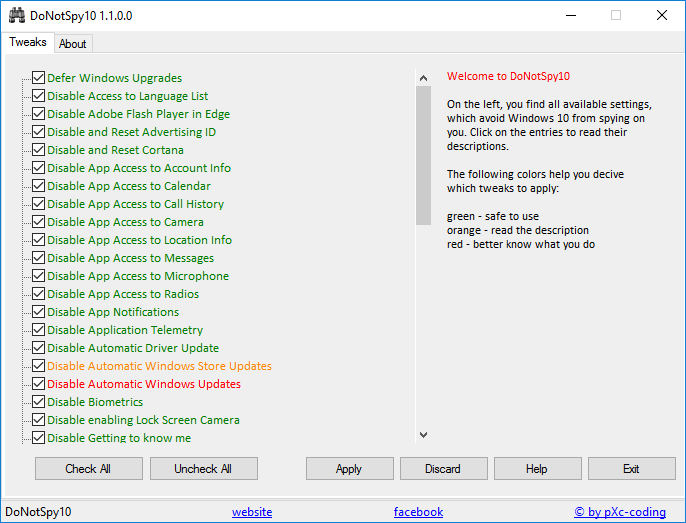
    Secondly, the tool DoNotSpy10 seems to rise to the occasion, too (found here). It also includes a long list of security tweaks, but the interface does not intimidate the user that much. Through its lighter design, running the tool checks for the fixes already present; color-coding warns the user of the severity of the fix, if applied.

    DoNotSpy10 Main Screen

    I can only trust the developer(s) of DoNotSpy10 tool that their list of fixes is full and nothing’s been left out (except those yet to be discovered?) as I don’t have the luxury of time to dig further into the matter of deeply enhancing my Windows 10 privacy experience. The only reported drawback of using the tool is found in the installation procedure: It seems to install the OpenCandy framework, as DoNotSpy10 is ad-supported. Per user quietman7 comments:

    [DoNotSpy10] appears to be detected as a Potentially Unwanted Program (PUP) / Potentially Unsafe Application (PUA) most likely because it includes OpenCandy.

    OpenCandy is an advertising application distributed by the OpenCandy Software Network which displays ads in other programs. The use of advertisement is a way to promote software packages and recover development costs. The OpenCandy FAQs answers many questions users may have about this product.

    OpenCandy is technically not installed on a computer, does not collect personally identifiable information and in most cases allows the user to choose whether or not to install advertised software recommended by the vendor. Although no personal information is collected, the software does collect anonymous statistics about events and other data during installation. See What information does OpenCandy collect?

    So just a word of precaution: although the developer(s) of DoNotSpy10 tool would like to seemingly obtain a small source of income to cover costs -and rightfully so- we are prompted to donate if we are happy with the tool, thus receiving the OpenCandy-free installer. In my honest opinion, OpenCandy doesn’t feel like a show-stopper and is seemingly harmless, definitely less important to deal with compared to all those privacy leaks of Windows 10.


    Have a good time with Windows 10, privacy-leak-free, everyone.